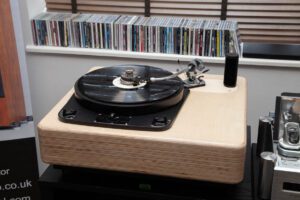
If you’re passionate about vinyl, you should invest in a record cleaning machine (RCM) sooner rather than later. Anyone buying used vinyl that is dusty, dirty, or marked with fingerprints must wet-clean their pre-owned LPs. Pro-Ject’s VC-S3 is an excellent and reasonably priced option. Constructed from aluminium-composite panels, it is very sturdy, measures 41.5 x 32.5 x 27.2 cm, and weighs 8kg. Washing records on the VC-S3 is entirely a manual process; it is not automatic.
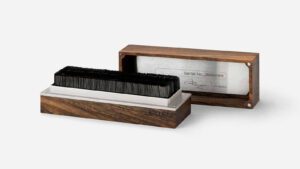
Pro-Ject provides a brush and cleaning fluid with the VC-S3. However, what primarily distinguishes various record cleaning machines is how the record is dried after wet cleaning. You can either allow a wet, freshly cleaned record to dry naturally or use a blower fan to expedite the process.
Sucking doesn’t suck
However, using a suction pump to vacuum off the liquid is most effective. It removes dirt and debris from the grooves. The VC-S3’s suction head vacuums the entire surface dry in three or four revolutions—approximately four to eight seconds. That’s about as fast as it gets.
The VC-S3 is user-friendly and hassle-free. Simply place an LP on the turntable, apply cleaning fluid, and use the brush to spread the liquid evenly over the surface. A magnetic clamp securely holds the disc in position without needing any tightening.
For the vast majority of records, wetting the grooves should be sufficient. However, very dirty LPs will require a more rigorous pre-wash. Once washing is complete, move the vacuum head into position and start the suction motor (with the platter rotating).
You have a choice of clockwise or anti-clockwise rotation. The suction is powerful, so the fluid will be removed within three to four full revolutions. Repeat the process for side two. The vacuum head has a thin velvet pad surrounding the air slot to prevent marking LP surfaces.
At some point, this pad will wear out and need replacement. Fortunately, a spare pad is included, along with an acrylic template to help you align it accurately. This is the only maintenance required by the user, aside from possibly needing to empty the used water tank occasionally.
Fan power
The total power consumption is approximately 815W. The turntable motor consumes about 15W, while the powerful suction fan uses 800W. The fan generates considerable noise—around 69dB when measured at a distance of 1m. In contrast, the (considerably more expensive) Degritter ultrasonic cleaner typically produces noise around 49 dB.

The VC-S3’s fan noise is not only 20dB louder, but it also sounds sharper. On the positive side, you’ll only need to endure the fan noise for about four to eight seconds. In contrast, the drying process with a Degritter takes much longer, ranging from four to ten minutes, depending on fan strength.
Letting your LPs dry naturally in free air might take 15 to 20 minutes or longer. My Keith Monks (KMAL) Pro RCM had a motorised suction arm that took 52 seconds to traverse an LP side from label to edge. The cheaper KMAL Prodigy also has a motorised arm, but it is slower, taking around two minutes and 40 seconds per side.
Simply wetting the record is usually enough to remove around 70% of the dust and dirt from the grooves. However, those looking to give their discs a thorough pre-wash should consider a cleaning bath, like Spin-Clean or Knosti’s Disco-Antistat. An ultrasonic bath is even more effective.
Longer washing times should improve sound quality, particularly if an ultrasonic bath is included in the process. LPs with many ticks and pops may need longer washing or soaking times to soften the deposits – much like dirty dishes with burnt-on food.
However, surface noise can sometimes result from groove damage, and no amount of cleaning can fix this. I attempted to deep clean an old, dirty, worn copy of Van Morrison’s Astral Weeks as thoroughly as possible. Unfortunately, despite my best efforts, much surface noise remained…
Nevertheless, after cleaning, the album sounded far more listenable. Subjectively, the surface ticks and pops were less irksome, and the music seemed to stand out from the noise with greater clarity and solidity.
All LPs benefit from cleaning
Even new or relatively recent LPs benefit from a wash. After wet cleaning, the sound typically becomes fresher, offering improved low-level detail and greater clarity. Once you experience this for yourself, you’ll likely want to clean almost every LP you own, whether it’s new or old.
After washing an LP, I always place a small round sticky label in the top left corner of the sleeve to indicate that it has been cleaned. I use one sticker for regular wet cleaning and two stickers for LPs that have been ultrasonically cleaned.

Inevitably, extending the pre-clean process takes more time and risks turning the entire washing procedure into somewhat of a hassle. However, for very dirty LPs and/or musically important albums, the extra effort is well worth it. You’ll hear the difference…
It’s a great advantage to quickly wash an LP just before listening. Imagine sitting down to enjoy an LP, only to play it for a few seconds and realise it needs cleaning. With many wet-clean systems, the full washing and drying process can easily take 8 to 15 minutes, or even longer.
That’s quite a delay before you can finally listen. However, with a VC-S3, you can clean both sides in under four minutes. Of course, you can also batch-clean a selection of LPs in advance. The choice is yours.
The operation is straightforward, but first, I practise cleaning and drying an unimportant LP to get the hang of it. To avoid leaving a faint radial line of water after drying, I switch off the vacuum pump while the record is still spinning and then lift the suction arm a second or two later.
Closer to the edge
If the KMAL RCM had a weakness, it was its ability to dry the outer edge of an LP. The suction nozzle on the KMAL worked better on LPs with a flat edge compared to those with a raised one. The VC-S3 is more effective at drying the edge but is not as efficient in the central area near the label. You can’t win!
Once the drying cycle is complete, if a few droplets remain in the area near the label, gently buff the surface dry using a soft cotton cloth. If you notice a few slightly misty patches, leave the record out to air dry for a few minutes before placing it in its sleeve.
Wet cleaning eliminates dust and debris while also removing the mould release agent. This agent aids in the manufacturing process by helping the stamper separate more easily from the newly pressed vinyl LP. Washing away any residue leaves the grooves feeling smoother and reduces friction.
I’m convinced that playing wet-cleaned LPs helps extend the lifespan of your pickup cartridge. With less ‘pull’ on the stylus, music reproduction sounds more relaxed and effortless. You’ll notice improved left/right channel separation and cleaner results toward the edges.
Unfortunately, ‘peak level’ cleanliness isn’t permanent. Vinyl ‘sweats’ over time, causing the grooves to gradually become slightly grungy again. I’ve particularly noticed this with LPs I’ve cleaned very thoroughly; they tend to lose their pristine cleanliness after about a year.
So, even if you always handle your LPs with care, avoid touching the surfaces, and don’t leave discs out to gather dust, freshly washed vinyl will not remain 100% perfect forever. However, this is quite specific; these discs will still be exceptionally clean by most standards…
Both sides now…
Based on my experience, I suggest playing both sides of an LP immediately after cleaning rather than placing it directly into its sleeve. Playing an LP right after washing is likely to dislodge any dirt or debris still trapped in the grooves before it can become too firmly embedded. This physical cleaning with the stylus is most effective with pickups that track at 1.8g to 2g or higher.
In retrospect, the ‘noisy LP surfaces’ that troubled many enthusiasts in the ‘60s and ‘70s were largely caused by phono cartridges that tracked at ultra-low downforces. Playing at less than 1g left the stylus very vulnerable to dust and debris…
Incidentally, Pro-Ject cautions that the VC-S3 is intended for home use only; it’s not meant for record shops cleaning perhaps 50 or more albums daily. Nevertheless, the unit itself feels sturdy and well-constructed, even if it isn’t designed for rigorous professional use.
Having mentioned the KMAL professional RCM, I’m saddened to report that mine finally died in early 2024; the motor used for suction stopped working. It was at least 50 years old, and I had owned it for over 35 years, so I got plenty of use from it…
Unfortunately, the large motor (engine!) is no longer available, so I worry that it can’t be repaired. I need a replacement machine, but the Pro KMAL RCM is a tough act to follow. Therefore, I can pay the Pro-Ject VC-S3 no higher compliment when I say it has stepped into some pretty big shoes and filled them.
Simply put, the Pro-Ject VC-S3 is an exceptional record cleaning machine that meets all requirements. Priced at just £429, it offers great value, is quick and easy to use, and produces excellent results. For the price, you won’t find a better option…
Technical specifications
- Cleaning speed: 30 RPM
- Included accessories: Brush, Vacuum Arm, Self-Adhesive Arm Strip, Magnetic clamp, Wash it 2 (100ml), Power cable
- Power connection: 110/120 or 230/240 Volt; 50 or 60 Hz
- Dimensions (W x H x D): 41.5×32.5×27.2cm
- Weight: 8kg
- Price: £429, $799, €699
Manufacturer
Pro-Ject Audio Systems
UK distributor
Henley Audio
+44(0)1235 511166
Trending Articles
See all

Degritter record cleaning machine
- Aug 23, 2021
The history of the LP
- Dec 20, 2023


By Jimmy Hughes
More articles from this author

Read Next From Review
See all
Meridian Audio Ellipse
- Mar 18, 2026
Amphion Argon3X
- Mar 18, 2026
WK Audio TheRAY
- Mar 18, 2026
Bluesound Node ICON
- Mar 09, 2026